Updated 10 months ago
What is a solar charge controller and why are they important?
Written by Ben Zientara Ben ZientaraBen Zientara is a writer, researcher, and solar policy analyst who has written about the residential solar industry, the electric grid, and state util...Learn more

Why you can trust SolarReviews
SolarReviews is the leading American website for solar panel reviews and solar panel installation companies. Our industry experts have a combined three decades of solar experience and maintain editorial independence for their reviews. No company can pay to alter the reviews or review scores shown on our site. Learn more about SolarReviews and how we make money.
As the name suggests, a solar charge controller is a component of a solar panel system that controls the charging of a battery bank. Solar charge controllers ensure the batteries are charged at the proper rate and to the proper level. Without a charge controller, batteries can be damaged by incoming power, and could also leak power back to the solar panels when the sun isn’t shining.
Solar charge controllers have a simple job, but it's important to learn about the two main types, how they work, and how to pair them with solar panels and batteries. Armed with that knowledge, you'll be one step closer to building an off-grid solar system!
Key takeaways
Solar charge controllers allow batteries to safely charge and discharge using the output of solar panels.
A charge controller is needed any time a battery will be connected to the direct current (DC) output of solar panels; most often in small off-grid systems.
The two kinds of charge controllers are pulse-width modulation (PWM) and maximum power point tracking (MPPT).
PWM charge controllers are less expensive, but less efficient, and are best suited for small off-grid systems with a few solar panels and batteries.
MPPT charge controllers are more expensive and more efficient, and are good for larger off-grid systems that can power a small home or cabin.
The top off-grid charge controllers are made by brands like Victron, EPEVER, and Renogy, but non-brand-name charge controllers can be just fine if you know what to look for.
Who needs a solar charge controller?
A charge controller is necessary any time a battery bank will be connected to the direct current (DC) output of solar panels. In most cases, this means a small off-grid setup like solar panels on an RV or cabin. If you're looking for information on how to use solar and batteries off the grid, you're in the right place!
There are also charge controllers aimed at providing battery backup for an existing grid-tied solar system that is on the roof of a home or business. This application requires a high-voltage charge controller and usually involves rewiring the system to direct a portion of the solar output through the charge controller.
How does a solar charge controller work?
Fair warning before we get started: we're about to discuss voltage, amperage, and wattage. If you need a refresher on how these things work together, check out our article on watts, kilowatts, and kilowatt-hours.
A solar charge controller is connected between solar panels and batteries to ensure power from the panels reaches the battery safely and effectively. The battery feeds into an inverter that changes the DC power into AC to run appliances (aka "loads").
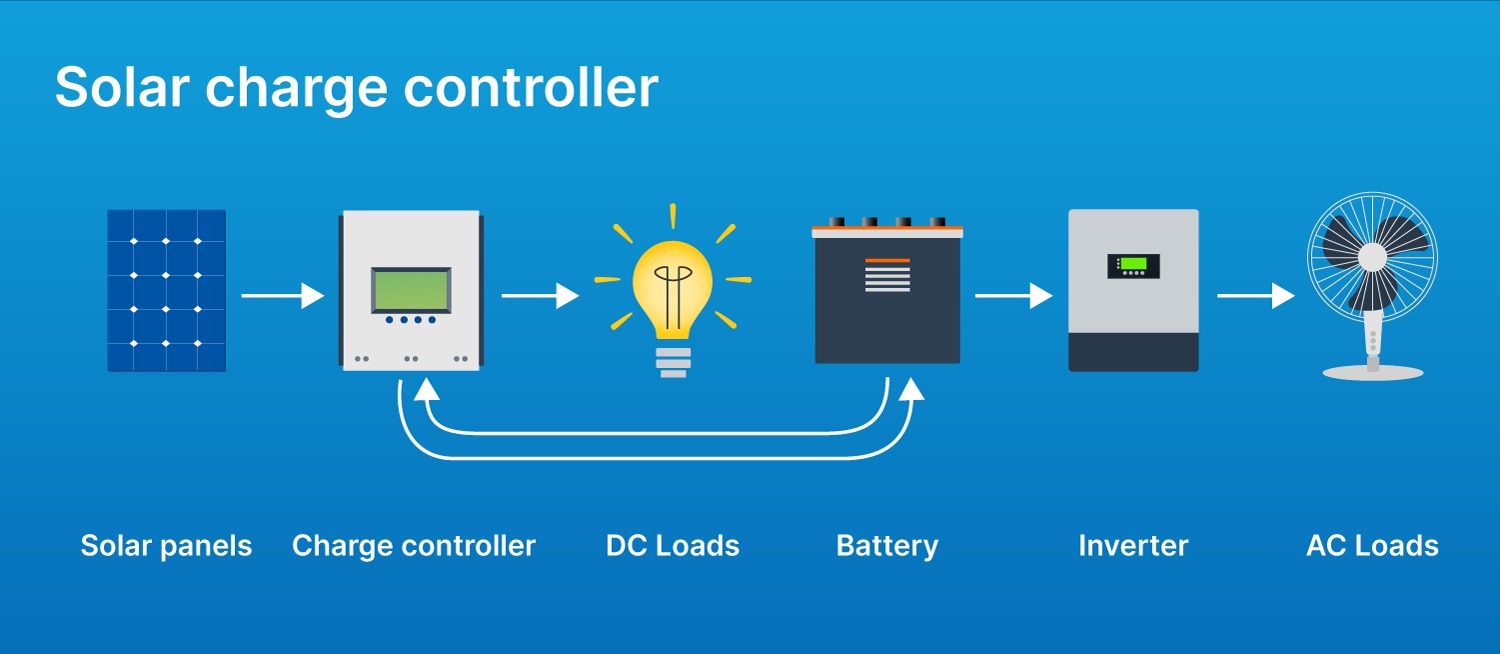
The four main functions of a solar charge controller are:
Accept incoming power from solar panels
Control the amount of power sent to the battery
Monitor the voltage of the battery to prevent overcharging
Allow power to flow only from the solar panels to the batteries
As a battery charges, its voltage increases, up to a limit. The battery can be damaged if an additional charge is applied past this limit. Therefore, the ability of a battery to provide or accept power can be measured by its voltage. For example, a typical 12-volt AGM lead-acid battery will show a voltage of 11.8 volts at 10% charged to 12.9 volts at 100% charge.
The main function of a solar charge controller is to ensure the amount of power that is sent to the battery is enough to charge it, but not so much that it increases the battery voltage above a safe level. It does this by reading the voltage of the battery and calculating how much additional energy is required to fully charge the battery.
Another important function of the charge controller is to prevent current from traveling back into the solar panels. When the sun isn't shining, the solar panels aren't producing any voltage. Because electricity flows from high voltage to low voltage, the power in the battery would flow into the solar panels if there was nothing in place to stop it. This could potentially cause damage. The charge controller has a diode that allows power to flow in one direction, preventing electricity from feeding back into the panels.
How solar power gets from panels to batteries
As we mentioned above, power flows from high voltage to low. So, to add energy to the battery, the output voltage of a solar panel must always be a little higher than the voltage of the battery it’s charging. Thankfully, solar panels are designed to put out more voltage than a battery needs at any given time.
Here’s an example: Say you have a single 100-watt solar panel and a 12-volt battery. Remember from above that a 12-volt battery is actually able to charge up to about 12.9 volts. 12 volts is what is called its “nominal voltage,” while the actual voltage of the battery depends on how charged it is. It might sink to 11.8 volts at low charge, and 12.9 volts when full.
The 100-watt solar panel can put out a maximum of 18 volts, which is a little too high for the battery to accept safely. Leaving it connected to the battery too long could result in a dangerous situation, eventually causing pressure to build up inside the battery and vent out the side as chemical steam.
You need a charge controller in between the solar panel and the battery to limit the voltage available to the battery. But it’s not just about the voltage - it also has to withstand a certain amount of current (amperage) flowing through it. That’s where the amperage rating of the charge controller comes in.
Charge controller amperage rating
The number of amps of current a charge controller can handle is called its “rating.” Exceeding the amperage rating can cause damage to the wiring within the charge controller. Let’s consider a charge controller rated to handle 30 amps of current. The single 100- watt solar panel described above puts out 5.5 amps of current at 18 volts. That amperage is much lower than the charge controller’s maximum of 30 amps, so the charge controller can easily handle the output of the singular solar panel.
In fact, it could handle the output of multiple solar panels wired in parallel (which increases current output). But there’s an important rule about charge controller ratings to consider: always make sure your charge controller is rated to handle 25% more amps than your solar panels are supposed to put out. That’s because solar panels can exceed their rated current output under especially bright sun, and you don’t want to fry your charge controller on the rare occasion when that happens.
Keeping that rule in mind, the 30-amp charge controller in our example could accept a nominal output of up to 24 amps. You could wire as many as four of those 5.5-amp solar panels in parallel to create a solar array capable of putting out 22 amps, staying under the charge controller’s rating plus the 25% cushion. If you think you might expand the size of your solar array in the future, get a charge controller rated for 50% more amps than your immediate needs.
Matching voltages
Another consideration when choosing a charge controller is the voltage of the battery bank you want to charge. Wiring batteries in series increases the voltage they can deliver and accept. For example, two 12-volt batteries wired in series will operate at 24 nominal volts. There are charge controllers on the market that can pair with battery banks of 12, 24, 36, and 48 volts. You need to make sure the charge controller you purchase can pair with the voltage of the battery bank.
Battery charging stages
There are three stages of charging a battery: bulk, absorption, and float. They correspond to how full the battery is.
Bulk: When a battery charge is low, the charge controller can safely push a lot of energy to it, and the battery fills up with charge very quickly.
Absorption: as the battery nears its full charge (around 90%), the charge controller reduces its current output, and the battery charges more slowly until it’s full.
Float: when the battery is full, the charge controller lowers its output voltage just a bit to maintain the full charge.
Think of it like pouring water from a pitcher into a cup with a very slow leak: when the cup is empty, you start pouring and quickly increase the amount of water being poured until the cup is nearly full. Then you reduce the flow until the cup is full. In order to keep the cup full despite the leak, you pour just a trickle to keep it topped off.
The bulk/absorption/float process was developed for lead-acid deep cycle batteries. Some newer lithium batteries allow for higher current up until they're quite full, meaning a charge controller paired with a lithium battery can be set to shorten or eliminate the absorption stage.
Types of charge controller
There are two main ways to control the flow of power to a battery, and they correspond to the two types of charge controller: pulse-width modulation (PWM) and maximum power point tracking (MPPT).
Pulse-width modulation (PWM)
Pulse-width modulation is the simplest and cheapest automatic way to control the flow of power between solar panels and a battery. There are PWM charge controllers on the market for between about $15 to $40.
A PWM charge controller ensures the battery never charges to more than its maximum voltage by switching the power flow on and off hundreds of times per second (i.e. sending “pulses” of power) to reduce the average voltage coming from the solar panels. The width of the pulses reduces the average output voltage.
Here’s an image to illustrate how the pulses work:
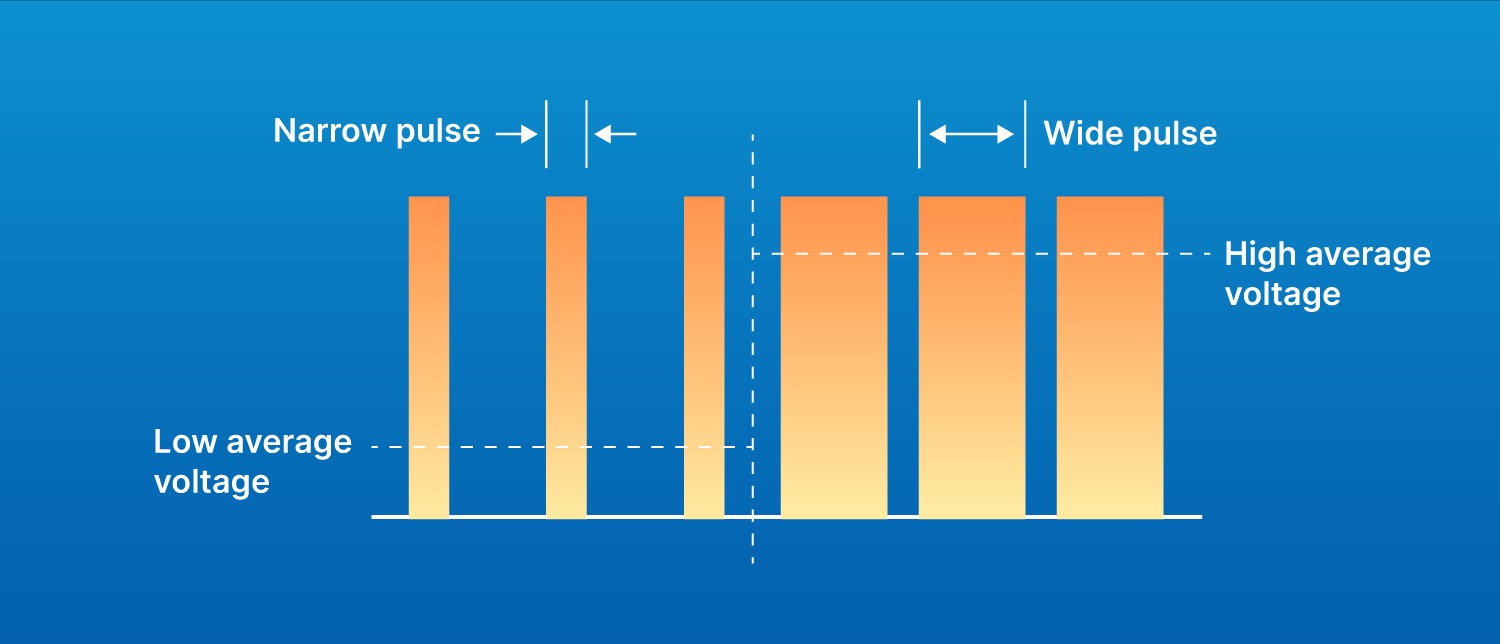
For example, if the charge controller accepts 18 volts from the solar panel, it might adjust the pulses so they’re on 82% of the time, and off 18% of the time. This would reduce the average voltage by 18%, down to about 14.8 volts, which can be used to charge a half-full AGM battery. As the battery gets close to a full charge, a PWM charge controller shortens the pulses even further, down to around 77% of the time, or 13.8 volts, to prevent the battery from overcharging.
Unfortunately, the excess energy produced by solar panels is wasted to reduce the output voltage. In our example, the charge controller would average around 80% efficiency. This means it’s very important to make sure the output voltage of the solar panels is not too much higher than the voltage of your battery bank with a PWM charge controller to minimize wasted energy. If your solar array outputs a much higher voltage, the PWM charge controller will cut that voltage down to what the battery can accept, and waste the rest.
Something like 80% efficiency is fine for small off-grid applications like a few solar panels hooked up to a couple of batteries, especially at the low cost of a PWM charge controller. For larger systems with much higher output, it is generally preferable to use the other kind of charge controller technology known as maximum power point tracking, or MPPT.
Maximum power point tracking (MPPT)
An MPPT solar charge controller operates by converting the incoming power from solar panels to match the theoretical highest-efficiency output at the right input voltage for the battery. The charge controller does this by calculating the point at which the maximum current can flow at a voltage the battery can accept, then converting the solar panel output to that mixture of voltage and current.
The major advantages of MPPT charge controllers are greater efficiency and compatibility with higher voltage solar arrays. This means that you can charge a 12V battery bank with a larger solar array wired in series, as long as you stay within the limits of the controller’s amperage rating. You can calculate this limit by taking the total wattage of the solar array and dividing it by the voltage of the battery bank to get the maximum possible output in amps.
Let’s use the same example numbers as before. The solar panel is putting out 100 watts, or about 5.5 amps into 18 volts. The MPPT charge controller converts the output to 14.8 volts but loses about 5% of the power in the conversion process. So the MPPT controller’s output current is about 6.4 amps, times the 14.8 volts, or 95 watts.
Theoretically, in an hour of full sun, the MPPT charge controller will have delivered 95 amp-hours of energy to the batteries, compared to the PWM charge controller’s energy output of about 80 amp-hours. In practice, it isn’t quite that simple, as solar pro Will Prowse discovered in this video:
Common features and settings on a charge controller
The basic features of the simplest PWM charge controller include the ability to set the type of battery and battery bank voltage, and lights indicating the phase of charging (bulk, absorption, and float). More advanced PWM and MPPT models come with a small LCD display for programming and data display, a heat sensor port to monitor battery temperature, and a communications port to connect the charge controller to an external display or computer. The most advanced charge controllers offer Bluetooth connectivity and an app for customizing settings.
Recommended products
There are tons of fine charge controllers available on the market. Search any solar supply or online marketplace like Amazon and you’re bound to turn up dozens of results.
The cheapest PWM charge controllers can be had for around $15, and are often rebranded versions of the same design. These lack many features but are relatively reliable for how inexpensive they are. More expensive PWM charge controllers built with better quality materials can be had for under $50, while full-featured MPPT charge controllers are priced anywhere from $100 to $200.
Below are a few of our recommended charge controllers at different price points for a medium-sized off-grid setup.
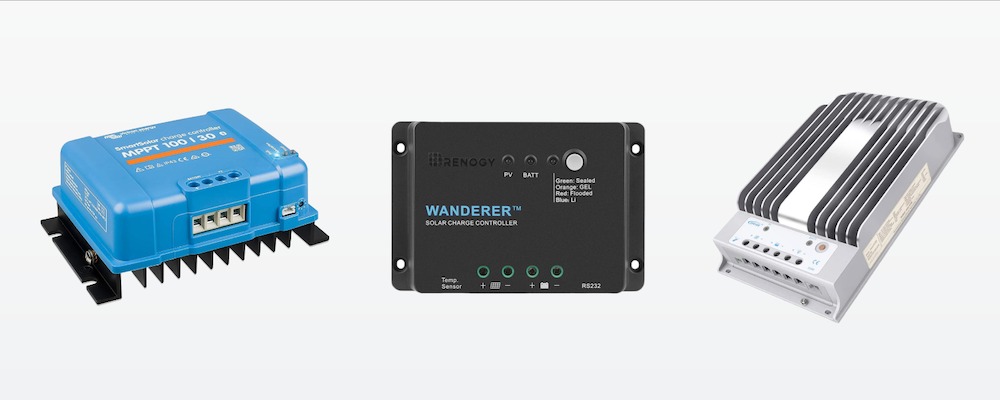
Renogy Wanderer 30A 12V PWM
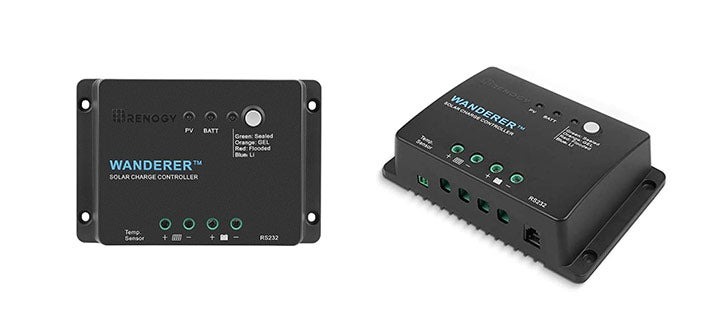
The Renogy Wanderer 30A PWM charge controller is a solid choice for a smaller off-grid setup. It can handle up to 30A of current at 12V, so it’s not meant for a large system.
It doesn't have a screen, but it does pair with the three main kinds of lead-acid batteries as well as lithium ones. It has a connector port for an optional temperature sensor and includes an RS232 port that can be used to program the charge controller or even to add Renogy's BT-1 Bluetooth module for connecting to the Renogy app on your smartphone.
The Wanderer can be had for about $40 from Amazon or Renogy direct.
EPEVER Tracer BN 30A 12V/24V MPPT
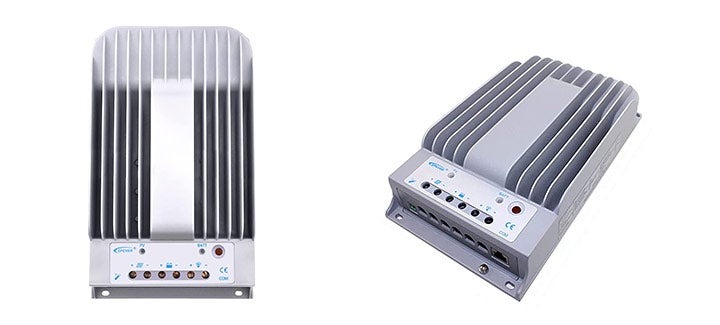
The EPEVER Tracer BN MPPT 30A charge controller is not the cheapest MPPT charge controller on the market, but it's a very good one. With a die-cast aluminum body, sturdy connectors, and a DC output to power loads like DC appliances or LED lights, the Tracer BN is a robust piece of equipment perfect for handling solar charging of lead-acid batteries in 12- and 24-volt banks. It can accept an incoming power output of up to 2,340 watts of solar panels (that's equal to three parallel strings of four 60-cell solar panels wired in series). The Tracer can be programmed to charge lithium batteries, but it doesn't come with a preset charging profile for them.
This EPEVER Tracer BN kit at Amazon includes a temperature sensor, mounting hardware, and a separate screen for programming and monitoring the health and state of charge of your battery system. Price at the time of publishing was $179.99.
Victron Energy SmartSolar 30A 100V MPPT
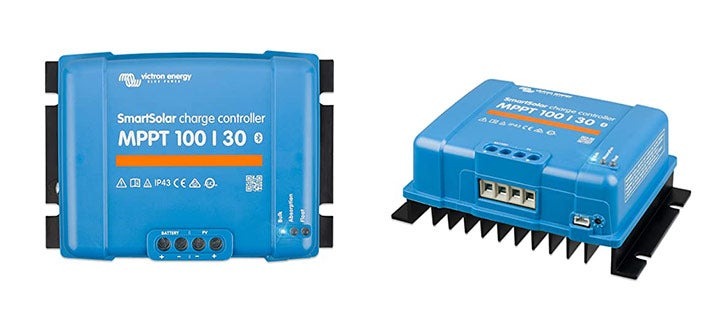
Victron is one of the most trusted solar brands in the world, and its technology is now becoming more widely available in the United States. This 30A, 100V charge controller is known as one of the best on market. Just like the EPEVER controller, it works with 12- or 24-volt battery banks but allows for slightly lower voltage solar input. To stay under this charger’s rating, you could run as many as three parallel strings of three 60-cell solar panels in series to achieve an output of 90 volts at around 20 amps (1,800 watts of solar output).
It's made with quality components, calculates maximum power point quickly and with high efficiency, and is very easy to use. The SmartSolar line of charge controllers all come with Bluetooth connectivity on board and can connect to the VictronConnect app on Android, iOS, macOS, and Windows for easy programming. Perhaps most importantly, you get a 5-year limited warranty that protects you against defects in materials and workmanship.
The SmartSolar 30A is the most expensive product on our list at around $225 on Amazon, but reading the reviews from its users, you can see why the expense might be worth it.
Solar charge controllers: are they right for you?
All the information above should give you a good basis of knowledge about how solar charge controllers work and how to pair them with solar panels and batteries, but there’s no substitute for practical, hands-on experience! If you have a few bucks to spend, you can set up a pretty simple off-grid solar “generator” using a single solar panel, a charge controller, a battery, and a cheap inverter. Choosing a charge controller that’s oversized for a small application gives you a chance to increase the size of the solar array and battery bank as you gain experience or find new ways to use the stored solar energy.
Now go out there and start making solar and batteries work for you!
Ben Zientara is a writer, researcher, and solar policy analyst who has written about the residential solar industry, the electric grid, and state utility policy since 2013. His early work included leading the team that produced the annual State Solar Power Rankings Report for the Solar Power Rocks website from 2015 to 2020. The rankings were utilized and referenced by a diverse mix of policymakers, advocacy groups, and media including The Center...
Learn more about Ben Zientara